
If you are looking for an iOS charting tool that offers a friendly API, short learning curve, and a large number of chart types, read on. Highcharts iOS is designed specifically to simplify the process of creating, crisp, interactive charts in native iOS apps.
Here are the simple steps involved in setting up a project with Highcharts iOS. (Read complete API docs here)
1. Preparing your project
First of all, you have to download the iOS Highcharts framework. To do that, choose one of the three options below:
- A direct download from Github.
- Use Cocoapods by adding
pod 'Highcharts'to your PodFile. - Use Carthage by adding
github "https://github.com/highcharts/highcharts-ios" >= 1.0.2to your Cartfile
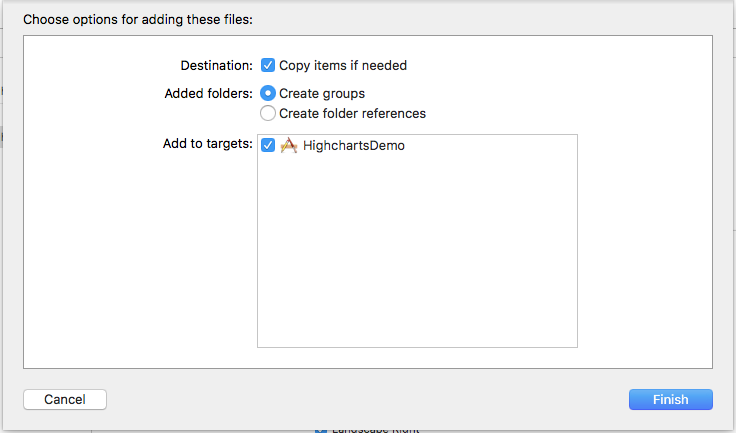
Then, include the framework to your project by copying it under the folder Frameworks, if it doesn’t exist just create one. Remember to check “Copy items if needed” option, then click on finish (see pictures below):

The last task of this section is to go to your project settings and add Highcharts to Embedded Binaries:

You are now set to use iOS Highcharts framework!
2. Using Highcharts (demo app)
To be able to use the app demo, you have to import Highcharts at the top in your AppDelegate. Open the file AppDelegate.m and copy/paste this line #import <Highcharts/Highcharts.h>.
To preset the chartView and set some initial options, you have to insert the following line to your application:didFinishLaunchingWithOptions
[HIGChartView preload];
Then include Highcharts.h to the View Controller. Open your ViewController.m file and write #import <Highcharts/Highcharts.h>.
If you would like to have easy access to the chart, set the property in the ViewController as following:
@interface ViewController ()
@property (strong, nonatomic) HIGChartView *chartView;
@end
Now, the project is set to create your first chart.
3. Create a chart
Column charts are very popular and versatile charting type, for this simple reason, our demo chart will be a column chart.
To create the chartView with defined origin and size, add the following line in viewDidLoad:
self.chartView = [[HIGChartView alloc] initWithFrame:CGRectMake(self.view.bounds.origin.x, self.view.bounds.origin .y + 20, self.view.bounds.size.width, 300.0f)];
The main important piece of the chart is HIOptions class, as it contains all the information needed to render a chart. Actually, only the data is required to create a basic chart, but for the sake of this article let’s see how you can implement more useful information.
Before you implement any feature to your chart, you need to create an instance of HIOptions class HIOptions *options = [[HIOptions alloc]init];
It is a good habit to specify chart’s type. To do so, create HIChart class object and set its type to “column”
HIChart *chart = [[HIChart alloc]init];
chart.type = @"column";
options.chart = chart;
It is always wise to set a title to a chart, as it adds more clarity to the users about the purpose of the chart:
HITitle *title = [[HITitle alloc]init];
title.text = @"Demo chart";
options.title = title;
Now, it is time to introduce the data. Keep in mind that because the chart is a column type chart, you need to use HIColumn data series prior starting writing the data:
HIColumn *series = [[HIColumn alloc]init];
series.data = @[@49.9, @71.5, @106.4, @129.2, @144, @176, @135.6, @148.5, @216.4, @194.1, @95.6, @54.4];
The Options feature is designed to store multiple series. In this demo, you need only one series defined as one-element-array options.series = @[series];
Don’t forget to link the options feature to the chartView self.chartView.options = options;
Then, add chartView as subview to your View Controller’s view [self.view addSubview:self.chartView];
That’s it! You are now set to run the demo :).
Your View Controller .m file should look like this code:
#import "ViewController.h"
#import <Highcharts/Highcharts.h>

@interface ViewController ()
@property (strong, nonatomic) HIGChartView *chartView;
@end

@implementation ViewController

- (void)viewDidLoad {
    [super viewDidLoad];
    // Do any additional setup after loading the view, typically from a nib.
    self.chartView = [[HIGChartView alloc] initWithFrame:CGRectMake(self.view.bounds.origin.x, self.view.bounds.origin.y + 20, self.view.bounds.size.width, 300.0f)];

    HIOptions *options = [[HIOptions alloc]init];

    HIChart *chart = [[HIChart alloc]init];
    chart.type = @"column";
    options.chart = chart;

    HITitle *title = [[HITitle alloc]init];
    title.text = @"Demo chart";
    options.title = title;

    HIColumn *series = [[HIColumn alloc]init];
    series.data = @[@49.9, @71.5, @106.4, @129.2, @144, @176, @135.6, @148.5, @216.4, @194.1, @95.6, @54.4];
    options.series = @[series];
    self.chartView.options = options;

    [self.view addSubview:self.chartView];
}
- (void)didReceiveMemoryWarning {
    [super didReceiveMemoryWarning];
    // Dispose of any resources that can be recreated.
}
@end
Press “Run” in XCode, and Voila! You have your chart with just a few steps.

Feel free to add more features and personalize your chart using colors, labels, etc.
The best way to really grasp the capabilities that iOS Highcharts offers you is by creating charts and be creative. To explore more advanced features take a look at demo app HighFit provided by Highcharts or read the following documentation.


Leave a Reply