
TinyMCE is an online rich-text editor released as open-source software under the LGPL. It makes it easy to convert HTML textarea fields or other HTML elements into WYSIWYG editor instances. And in this tutorial, we will show you how to integrate the Highcharts Charts Editor with the TinyMCE editor using a simple plugin. This will allow you to create interactive charts within the TinyMCE editor, and embed those charts wherever the TinyMCE editor is used.
The integration in the example below is done on your local machine, but the exact same steps apply for your production application.
Remark
You need to have a web server to run and test the integration. In this tutorial, I use the Brackets editor since it offers a live preview using an internal web server.
Let’s get started.
Architecture
To give you an idea about the global architecture, let’s take a look at the picture below:

The global architecture is simple; there are three main components:
- Highcharts editor
- TinyMCE plugin
- TinyMCE editor
The TinyMCE plugin is the interface/link between the Highcharts editor and the TinyMCE editor.
The Highcharts editor plugin includes the Highcharts editor and the TinyMCE plugin.
Now, you have an idea about the main components; let’s set up the project.
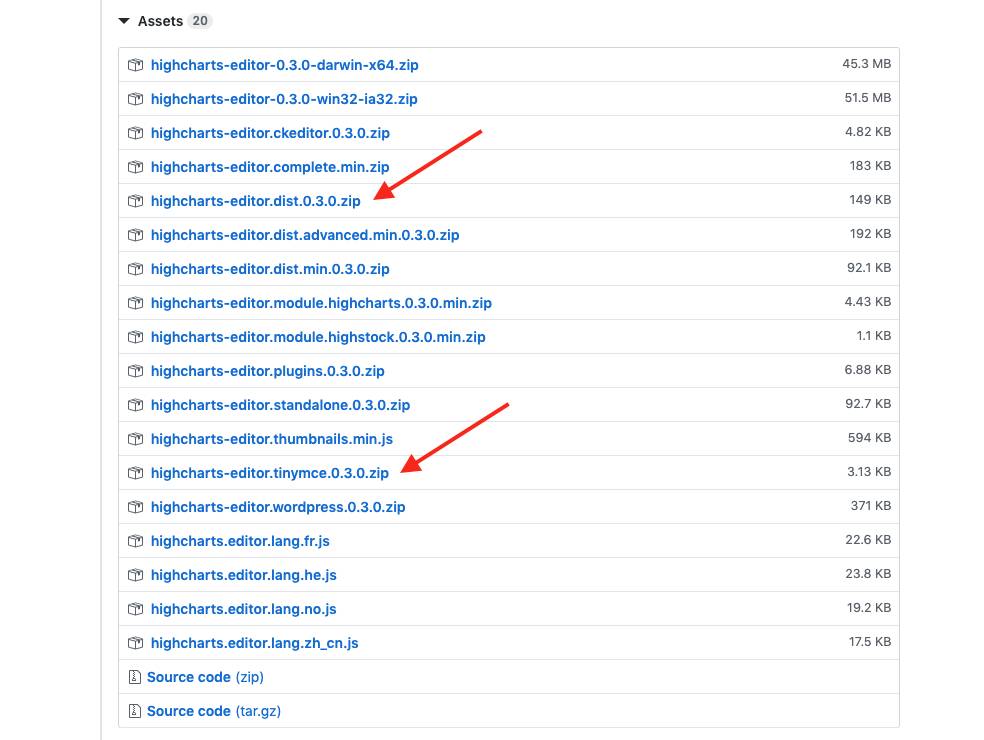
First, let’s create a folder where we’ll gather and run the project; then download the Highcharts editor and the TinyMCE plugin from this link.
In the highcharts-editor.min.dist, you will find the Highcharts editor and the CSS file as well.
To set up the TinyMCE editor, you need the link to the editor and the tinymce.init function. To do that, create an index.html file, then add the following script: <script src='https://cdnjs.cloudflare.com/ajax/libs/tinymce/5.0.6/tinymce.min.js'></script>, and create a file main.js, then copy/paste the following code for TinyMCE version 5:
tinymce.init({
  selector: "#chart-result",
  plugins: [
    "advlist autolink lists link image charmap print preview anchor",
    "searchreplace visualblocks code fullscreen",
    "insertdatetime media table contextmenu paste",
    "highcharts highchartssvg noneditable"
  ],
  toolbar: "insertfile undo redo | styleselect | bold italic | alignleft aligncenter alignright alignjustify | bullist numlist outdent indent | link image",
  menubar: "file edit insert view format table tools help highcharts",
  menu: {
    highcharts: {
      title: "Highcharts",
      items: "highcharts"
    })
});
In case you are using TinyMCE version 4, copy/paste this code:
tinymce.init({
  selector: '#chart-result',
  height: 550,
  plugins: [
    'advlist autolink lists link image charmap print preview anchor',
    'searchreplace visualblocks code fullscreen',
    'insertdatetime media table contextmenu paste',
    'highcharts highchartssvg noneditable'
  ],
  toolbar: 'insertfile undo redo | styleselect | bold italic | alignleft aligncenter alignright alignjustify | bullist numlist outdent indent | link image'
});
Remark
In case you previously used TinyMCE version 4, note that version 5 API introduces several changes, including adding new options to the toolbar. Instead of having the Highcharts plugin integrated into an existing menu, we need to create a separate menu option for it:
- How to access to the Highcharts editor TinyMCE version 4.

- How to access to the Highcharts editor TinyMCE version 5.

To have access to different Highcharts charts’ types and options add the following libraries and modules:
- highstock.js
- highcharts-more.js
- highcharts-3d.js
- modules/data.js
- module/exporting.js
- modules/funnel.js
- modules/solid-gauge.js
The final index.html will look like:
<html>

  <link href="highcharts-editor.min.css" rel="stylesheet" type="text/css" />
  <script src="http://code.highcharts.com/stock/highstock.js" type="text/javascript" charset="utf-8"></script>
  <script src="https://code.highcharts.com/modules/data.js" type="text/javascript" charset="utf-8"></script>
  <script src="https://code.highcharts.com/highcharts-more.js" type="text/javascript" charset="utf-8"></script>
  <script src="https://code.highcharts.com/highcharts-3d.js" type="text/javascript" charset="utf-8"></script>
  <script src="https://code.highcharts.com/modules/exporting.js"></script>
  <script src="https://code.highcharts.com/modules/funnel.js"></script>
  <script src="https://code.highcharts.com/modules/solid-gauge.js"></script>
  <script src="highcharts-editor.min.js"></script>
  <script src="https://cdnjs.cloudflare.com/ajax/libs/tinymce/5.0.6/tinymce.min.js"></script>
  <script src="highcharts-editor.tinymce.js"></script>
  <script src="main.js"></script>

  <body>
    <textarea id="chart-result"> </textarea>
  </body>

</html>
That is it; all the components are set up. Now, all I have to do is to run the project using the live preview option in Brackets.
You can also try the live versions on CodeSandBox. Click on the Highcharts and add your own interactive chart into the TinyMCE ediot:
Feel free to share your questions and experiences in the comment field below; I will be happy to answer you.
Comments
There are no comments on this post
Want to leave a comment?
Comments are moderated. They will publish only if they add to the discussion in a constructive way. Please be polite.